 I like Yugen Kombucha
 J'adore Yugen Kombucha
Brew your own kombucha
It's a fun experience to brew your own kombucha. People across the globe have been brewing kombucha for centuries, passing on knowledge and scobies along the way. In this blog we want to share tips and tricks on how to brew your very own bubbly booch. After all, we also had very humble beginnings, fermenting 3 liter jars in the kitchen of our co-founder.
Kombucha in history
Without diving too deep into the history of kombucha, it is fun to know where kombucha came from and how it continues to inspire people to take good care of their bodies. The drink probably originated in Northeast China (historically referred to as Manchuria) around 220 B.C. Its name is reportedly derived from Dr. Kombu, a Korean physician who brought the fermented tea to Japan as a curative for Emperor Inkyo. Eventually the tea was brought to Europe as a result of trade route expansions in the early 20th century. The ancient beverage has surged in popularity in recent years and is now available in many grocery stores and health food stores.

Why make it yourself?
Brewing your own kombucha is a rewarding activity. It’s a fun and creative outlet and if you do it well, you end up with a delicious drink that you can share with friends or family. There are infinite ways to make and flavour kombucha so it puts your brain to work and gets the creative juices flowing.

Just like cooking, brewing brings you back into contact with natural and real ingredients. It teaches you the magic of fermentation, the work of billions of tiny organisms that transform those simple ingredients, into flavourful and healthy concoctions. You can take credit for their hard work and benefit from their digestion improving qualities, double win!
It forces you to take time and slow down. Brewing kombucha is not an overnight thing. Just like making wine or cheese, kombucha fermentation can’t be rushed. Enjoy the process and watch the bubbles rise, it’s a mindful and stress reducing way to pass time. It’s a Yugen moment!
Brewing equipment & ingredients
Brewing kombucha doesn’t take much equipment. Of course you can go nuts and buy fancy fermentation jars, heating pads, filter machines and much more. But basically all you need is a jar, a clean cloth with a rubber band and most importantly, a scoby.

For small home brew systems we’d advise a simple glass jar. Plastic containers can leach chemicals and introduce bad bacteria into your brew. High grade stainless steel and ceramic pots are also great but it’s just fun to watch the scoby grow in it’s own mini aquarium.
To protect the fresh brew from dust and insects, fruit flies in particular, they looooove kombucha, it’s necessary to cover it with a clean cloth or towel. Just keep it in place with a rubber band.
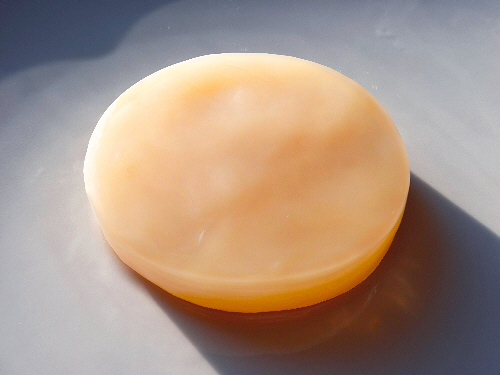
The SCOBY, or “Symbiotic Culture of Bacteria and Yeast”, is the rubber disk that floats on top of the kombucha. It contains all the essential microorganisms necessary to produce kombucha. Some people call it the mother, because it produces new layers during each brew. Those layers can then be shared amongst friends and family. This is probably one of the reasons why the drink survived for millenia. A rather unknown fact is that a SCOBY is actually not required to make kombucha. You can just as easily start a new batch with some raw unflavoured kombucha from the previous batch. We call this starter liquid. The necessary microorganisms live not only in the disk, but also in the liquid itself.
You can buy scobies and starter liquid online or just get some raw unflavoured kombucha from the store. If you happen to pass our brewery, we always have some spare ones hanging around so feel free to jump in.
Other ingredients of basic kombucha are tea (green or black tea, preferably organic) and sugar (cane or white sugar works best). You can also use honey or agave syrup, but stay away from artificial sweeteners, they are not a food source for the SCOBY.
The brewing basics
To brew great tasting booch you have to start off with great tasting ingredients. We only use filtered water and organic ingredients of the highest quality so we advise to do the same.
A basic recipe for 1 liter of kombucha is:
- 5 grams of tea
- 70 grams of sugar
- About 200ml of starter liquid or one decent sized scoby
1/ Heat 800ml of water to about 80°C. Try to control the temperature. Too hot and the tea turns bitter. Too cold and you won’t get all the flavours and nutrients. Turn down the fire and steep the tea for 2 to 15 minutes, depending on how strong you like the tea flavour. It’s best to use loose tea as it is of higher quality than teabags.

2/ Dissolve the sugar in the tea while it is still hot.
3/ Let the hot sugary tea cool down to room temperature before you add the starter liquid or SCOBY. Scobies are living organisms. If you heat them to a certain point, they die.
4/ Mix in the starter liquid or place the scoby in the jar. The scoby might stay on top or dive down below. It’s all good.
5/ Put a clean towel or cloth on top of the jar and store the jar away from direct sunlight in a warm spot (ideal is 25°C). The warmer the faster the fermentation. Below 10°C not much fermentation will happen and you might have to wait a looooong time for the booch to be ready. The cloth allows your kombucha to ventilate while keeping out bugs and other contaminants. If your kombucha cannot breathe, it won’t ferment.
6/ In a few days you should see a layer forming on top. This is the new scoby. Exciting times. As it grows it will become thicker. After about a week, gently push the scoby to the side with a straw and taste your kombucha. Is it still too sweet, let it ferment longer. The bigger the jar and the smaller the surface, the longer it will take to ferment. Taste daily to the point that you like the flavour (semi sweet and tart). After about 2 weeks most kombuchas should be ready but exceptions are the norm.
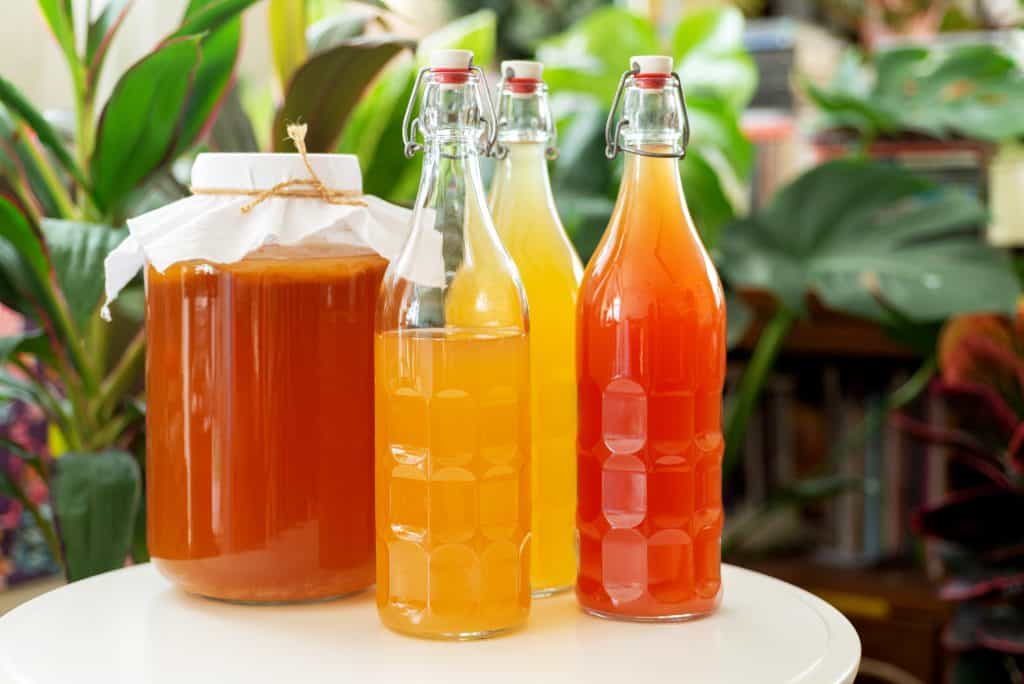
7/ Put 800ml of your ready to drink kombucha in a bottle and store it in the fridge. The cool temperatures will prevent further fermentation (and change of flavour). Keep 200ml behind for your next brew.
There are many great resources (books and websites) on how to brew basic kombucha. We will add some of our favourites at the bottom of this blog.
Tips & Tricks from the pro’s
After your base kombucha is finished you might want to add flavours and carbonation. The best method without force carbonating is to add organic 100% juice and bottle the flavoured kombucha in a swing top bottle. Then leave it at room temperature for a day or two, making sure to check it every so often by slowly opening the top to see if it has good carbonation. Once you have the carbonation, put it in the fridge. WARNING: Leaving it out and sealed for too long may cause the bottle to explode or product to gush out when opening. Make sure to test it over the sink or outside.

Kombucha is one of the easiest ferments but that doesn’t mean stuff can’t go wrong. The one potential problem with making kombucha at home is the possibility of a harmful bacteria or mold growing in the fermentation vessel. To avoid these problems, it is important to follow the correct procedures for brewing and to carefully sanitize all equipment before use. Brewing is 90% cleaning. Make sure everything (tools and fermenation area) are spick and span. If you see any mold growing on your scoby, or in the tea, toss your whole batch. Do not take the risk. It can be hard to distinguish mold from new scoby formation without experience but in general mold is circular, hairy, green, black or white and somewhat elevated. New scoby is irregular, see-through, smooth and shiny.
Sharing is caring
Brewing kombucha is exciting. People take great pride in their homebrews and love to share it with their friends. It makes us more connected with each other but also with ourselves. Fermenting food and drinks is a fun way to learn more about our health and the importance of the microbiome. Science is still researching many aspects but there is no doubt that our gut health matters.
Do you want to brew your own batch with a Yugen scoby? Fill in the form below and we'll contact you as soon as the scoby babies are ready.
| Name: | |
| Email: | |
| City: | |

Have fun
So brew, ferment, experiment, fail and try again. It’s all part of the kombucha cycle. Mix in herbs with the regular tea, age your kombucha in whiskey barrels, double ferment to make high alcohol kombucha. The possibilities are endless! Have fun and don't forget to spread the kombucha love (and scobies)!
Links to interesting blogs:
https://wellnessmama.com/2673/kombucha-recipe/
https://www.ohwecook.com/the-ultimate-guide-to-making-kombucha-at-home/
https://www.thekitchn.com/how-to-make-kombucha-tea-at-home-cooking-lessons-from-the-kitchn-173858
https://www.kombuchakamp.com/


Sign up for our newsletter & get 10% off your next order